The Ultimate Guide to Uniswap.
Learn how automated market making works and how you can add liquidity to start earning exchange fees.
⚡️⚡️⚡️⚡️⚡️⚡️⚡️⚡️⚡️⚡️⚡️⚡️⚡️⚡️
🦄What is Uniswap?
Uniswap is a protocol for automated token exchange on Ethereum.
Most exchanges maintain an order book and facilitate matches between buyers and sellers. Uniswap smart contracts hold liquidity reserves of various tokens, and trades are executed directly against these reserves. Prices are set automatically using the constant product market maker mechanism, which keeps overall reserves in relative equilibrium. Reserves are pooled between a network of liquidity providers who supply the system with tokens in exchange for a proportional share of transaction fees. Learn more about constant product (x*y=k) market maker mechanism.
The Uniswap Exchange is an opensource front-end interface for traders and liquidity providers to easily interact with Uniswap’s smart contracts.
This walk-through goes over 3 main functionalities available on Uniswap V1 today:
A. Swapping tokens.
B. Adding liquidity.
C. Removing liquidity.
A. Swapping tokens on Uniswap.exchange
1. Connect with Metamask and you’re in. No log-ins or KYC. This does not cost any gas.

2. Once you are in, choose which tokens you would like to trade. Keep in mind you will have to ‘unlock’ each token for trading if this is your first time using Uniswap. This right here is one of the most annoying steps for end users. For this you will need to pay a small gas fee (~$0.06).

3. Click swap to proceed with your exchange and confirm your Metamask popup. Again this transaction will require some gas.

B. Adding liquidity: DIY.
Liquidity providers earn exchange fees (0.3%). But calculating Uniswap pool returns is not this straightforward. Please refer to this post for additional research.
1. Adding liquidity requires depositing an equivalent value of ETH and ERC20 tokens into the ERC20 token’s associated exchange contract.
For example, if you want to add 1 ETH to the ETH/SNX pool, you will need to match your ETH deposit with SNX.
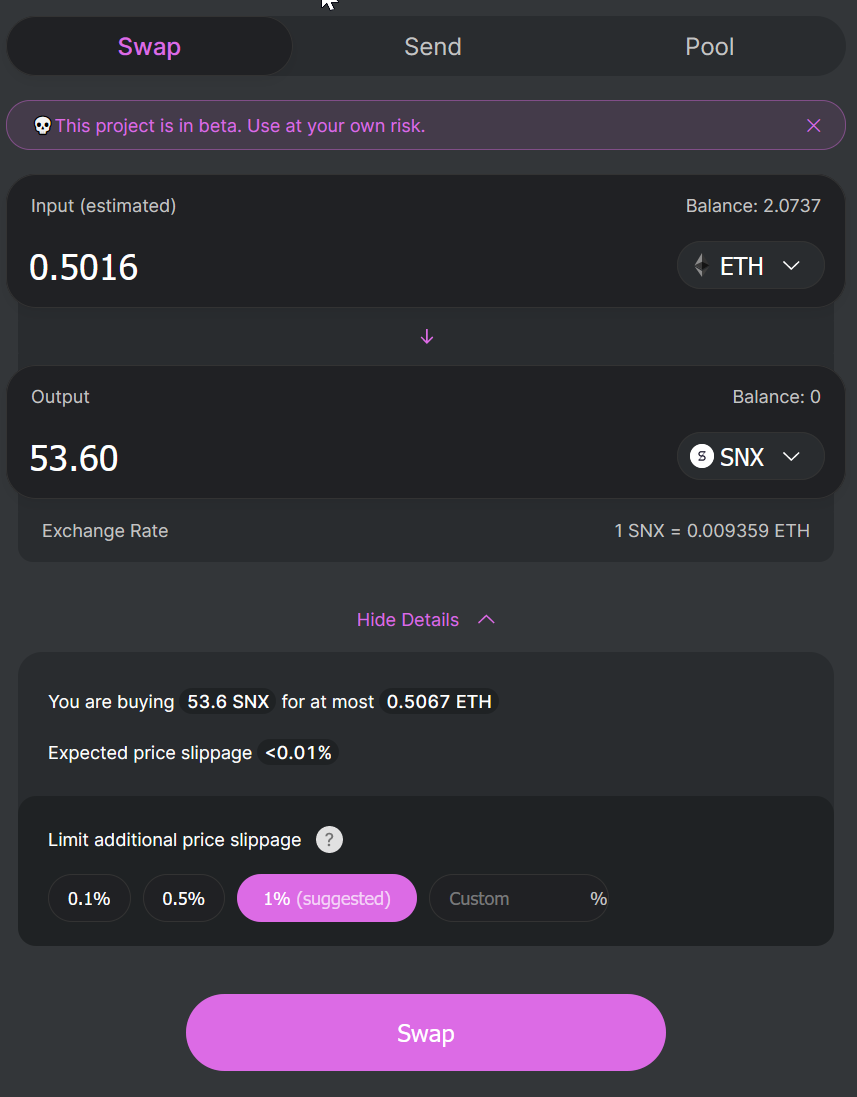
So you will need to either swap 0.5 ETH into SNX or deposit 1 ETH’s worth of SNX using the exchange rate at the moment of your deposit. So first let’s swap 0.5 ETH for SNX. (Exchange rate as of this writing: 1 ETH = 106.838121 SNX).
As you can see I’m actually swapping a little bit more than 0.5 ETH in order to make sure I have enough SNX to provide equivalent amount in case the exchange rate changes by the time I make the second transaction. Here’s my transaction which ended up costing ~$0.25 in gas.

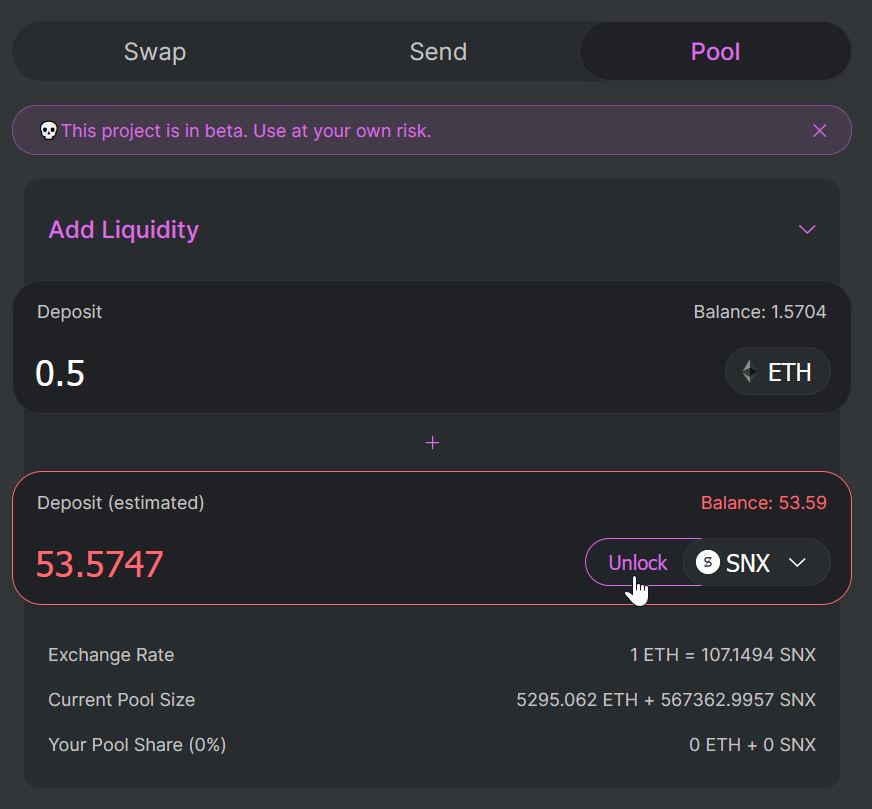
2. Once you have SNX, you will have to navigate to ‘Pools’ tab and ‘unlock’ SNX tokens. Here’s my transaction which ended up costing ~$0.15 in gas.

3. Finally, you can select SNX as your deposit token and if you click on your balance on the right, maximum possible amount will be applied. Click Add Liquidity and confirm your Metamask Transaction.
Liquidity tokens are minted to track the relative proportion of total reserves that each liquidity provider has contributed. They are highly divisible and can be burned at any time to return a proportional share of the markets liquidity to the provider.
Here’s my transaction which ended up costing ~$0.50 in gas.

Adding liquidity on your own summary:
3 Metamask interactions.
B. Adding liquidity in a single transaction using just ETH with DeFiZap.
Alternatively, DeFiZap allows you to one-click add liquidity to Uniswap Pools using just ETH.
DeFiZap auto-converts part of your ETH to DAI or SNX and then adds liquidity to the DAI or SNX Uniswap Pools. You receive back Uniswap liquidity tracking tokens.
Here’s my transaction through UniPool SNX Zap which ended up costing ~$0.90 in gas. As you can see I simply sent 1 ETH to this Zap and here’s what happened:
0.505 ETH was swapped for ~53.943 SNX.
0.495 ETH + equivalent SNX tokens (53.029) were used to add liquidity to SNX pool and mint 0.1784 uniswap liquidity tracking tokens which are always sent back to the user.
Remainder 0.914 SNX which didn’t end up getting used for pooling is sent back to the user.
Adding liquidity through DeFiZap summary:
1 Metamask interaction (vs. 3) + $0.90 in gas fees (unchanged) + more efficient use of assets for pooling.
C. Removing liquidity
1. Navigate to ‘Pool’ tab and choose ‘Remove Liquidity’ from a drop-down of choices.

2. Select your liquidity token (in our case SNX) and you will see your balance show up on the right. Once you click Enter Max, you will see how much ETH + SNX you will receive if you remove all of your liquidity from this pool. Here’s my transaction which ended up costing ~$0.23 in gas.

Additional learning resources:
Knowledge Base:
Feel free to share with anyone who wants to learn more about Uniswap.
⚡️ ⚡️ ⚡️ ⚡️ ⚡️ ⚡️ ⚡️ ⚡️ ⚡️ ⚡️ ⚡️ ⚡️ ⚡️ ⚡️ ⚡️ ⚡️ ⚡️ ⚡️ ⚡️ ⚡️ ⚡️⚡️ ⚡️⚡️
To learn more about the benefits of being an early adopter and shaping our product, join our Discord.
⚡️ ⚡️ ⚡️ ⚡️ ⚡️ ⚡️ ⚡️ ⚡️ ⚡️ ⚡️ ⚡️ ⚡️ ⚡️ ⚡️ ⚡️ ⚡️ ⚡️ ⚡️ ⚡️ ⚡️ ⚡️⚡️ ⚡️⚡️


